![]()
|
|
|
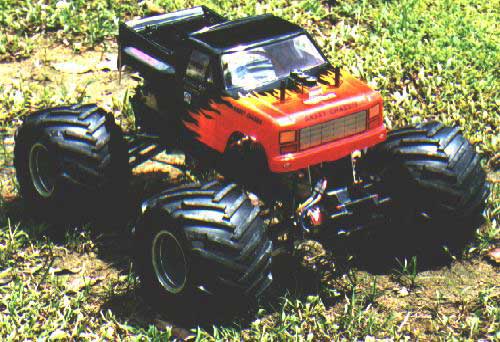
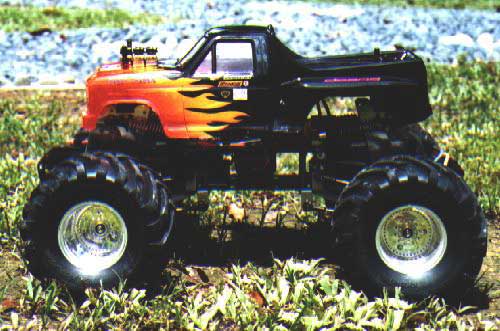
Phase II Body
Addition Bash
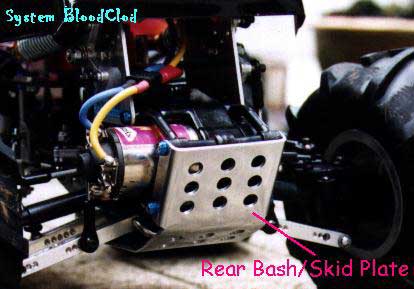
Plates The left is a pic of the front bash plate. It's attached to the front guard (drilled 3 holes) and to the aluminium gearbox braces under the chassis. It's made of 1.5mm thick aluminium which is easier to bend than the 2mm piece I used for the rear. So far it's held up fine... it also braces the gearbox braces very well. Here's a pic of the rear one. It's made of 2mm aluminium and it was a pain to bend! On the plus side is that it is VERY strong and I don't think anything will come close to destroying it. It's relieved for weight only on the rear cos the front portion is meant to skid over obstacles (i.e. holes might get hooked up or pick up dirt). It's attached to the rear guard and to the axle braces. The last picture gives you an idea of how the underside of the truck looks with the plates installed. Perry's
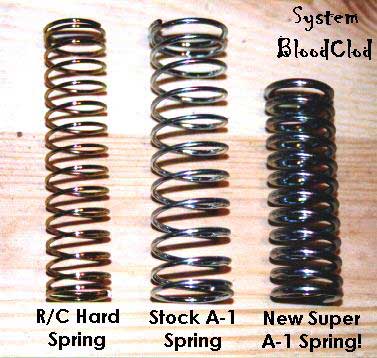
Heavy Duty Springs Along came this fix which my friend Perry fixed me up with. The left picture shows a comparison of 3 springs. The new springs (the rightmost one in the picture) may be shorter, but they don’t need to be compressed at all to hold up the truck. With these, the truck returns to full ride height and doesn’t bottom out anymore. The other 2 pictures show the springs installed on the truck with the new Kyosho gold shocks that I am now using. My setup: I run single hole pistons and 100 wt oil. To visit Perry's website, just go to my links page. A TIP: When using these springs with the kyosho gold shocks - I took out my Dremel and put on the sanding drum. I sanded the insides of the spring at both ends so that they would fit over the collars nicely. Don’t remove too much, just enough to get them on smoothly and your shocks should work great! Other
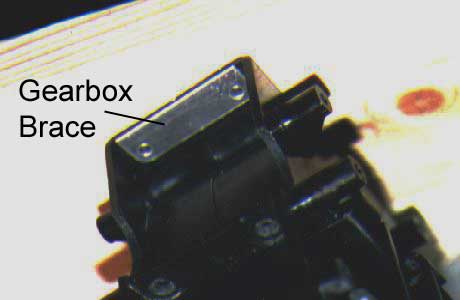
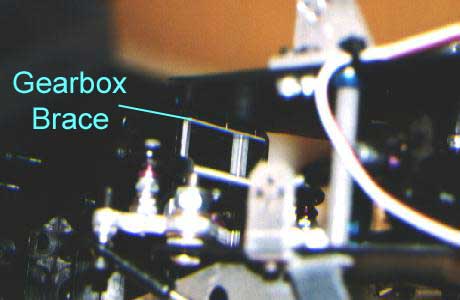
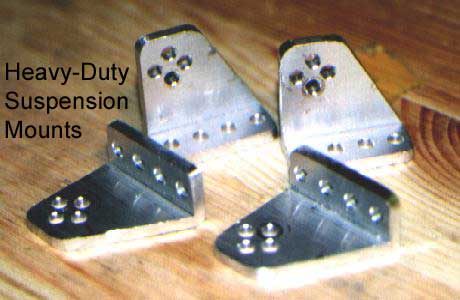
Custom Modifications The first picture shows the steering turnbuckles for the A-1. I sanded away the edges with my dremel to increase steering. I did this only with the front set. This allows the front wheels to turn more and really helps the truck to turn tighter. The second and third picture shows some gearbox braces I made. I noticed when I removed the gearboxes that there were cracks around the holes where they were attached to the Sassy graphite plates. This was because Sassy uses 2 long nuts at each end to mount the plates on and these nuts had a very small surface area which applied a lot of pressure on the plastic gearbox parts. I used 1mm thick aluminium to make these pieces and they have worked very well. The last picture shows some heavy duty shock mounts. I found that with the new springs the shocks were putting more pressure on the shock mounts and that they had bent a little. So I made these new mounts out of 3mm thick L-channel aluminium. They look good and are very tough. |